
Quick start guide
1. Setting up
FLOATSOFT does not require to be installed; it is a portable application that can be run from any directory on the licensed machine. FLOATSOFT is distributed as a single executable, and should be placed in any folder of your choosing that has Administrator privileges.
Upon running the FLOATSOFT for the first time, you will be presented with the license authentication window, as illustrated below.
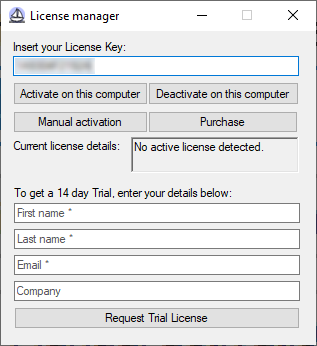
If you have already purchased a license, enter the provided License Key into the top field, and click Activate on this computer to register your license. Please note that the internet connection is required for the initial activation, but not required afterwards. If you are unable to connect the computer to the internet, click Manual activation and follow the prompts to activate offline. To transfer the license to another computer, click Deactivate on this computer, and repeat the activation procedure on the second machine.
If you do not have a license, you can try the application free of charge for 14 days by filling out the form below, and clicking Request Trial License. In a few moments, a Trial License will be activated. Please note that the internet connection is required to obtain the trial license.
After validating your license, you will be presented with the following window.
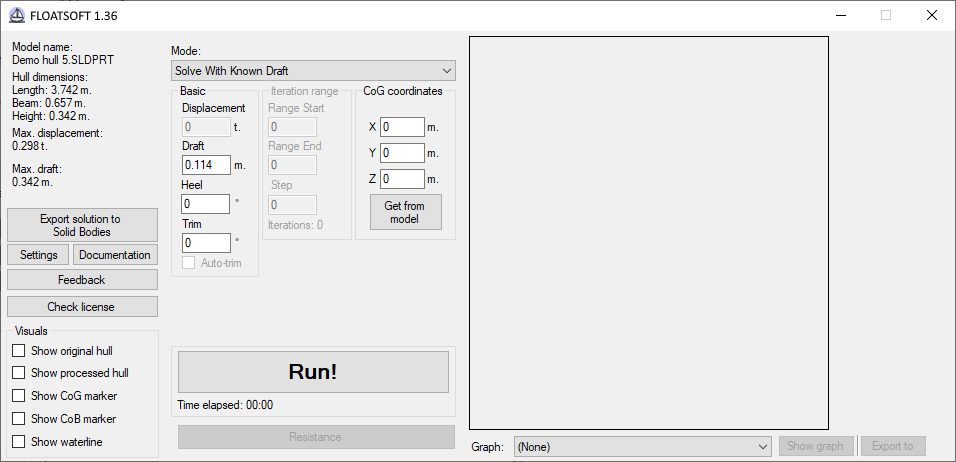
To begin, select the Mode from the drop-down menu at the top, fill out the enabled fields, and press Run! to start calculations. Make sure you check the Settings to enable or disable the calculations you require. It is recommended that you read the rest of this manual to learn more about the operations of FLOATSOFT before proceeding further. Most GUI elements have tool-tips to guide you through. Hover your mouse over each active control to learn more about it.
2. Suggested workflow
While you can use FLOATSOFT in any way you like, consider the following order of operations to maximize time efficiency and get the most out of this software:
1. Design a rough hull shape in SOLIDWORKS, following the guidelines explained in Model Requirements.
2. Run FLOATSOFT, and obtain the information needed to improve the hull shape.
3. Modify the hull as required.
4. Repeat steps 2 and 3 until the hull hydrostatics are approximately within the design parameters.
5. Use the resulting hull shape as a mould to develop the design (hollowing out the interior or offseting from the hull surfaces, building support and deck structures, creating additional parts, assigning materials, etc.). It is highly recommended that you design top-down, connecting the subsequent features to the initial hull model, so that any changes in the hull proportions will propagate throughout the design as fluently as possible. You can also export the hull shape to a separate SOLIDWORKS Part or Assembly file, but it is highly recommended that you maintain the link between the two models.
6. As the design reveals more accurate location of the center of mass, displacement and other properties, roll-back the Feature Tree to the point where the hull is still represented as a single Solid Body, and run FLOATSOFT again to fine-tune the hull shape.
7. Roll-forward the Feature Tree to update the subsequent features.
8. Repeat steps 6 and 7 until the design is perfected.
Additional tips:
- FLOATSOFT can perform calculations of the hull at any stage of it’s design, as long as the hull is still filled (not hollow), comprised of a single SOLIDWORKS Body, and is positioned correctly (refer to Model Requirements for more information).
- Though it should not affect the functionality of FLOATSOFT, it is still recommended that you exit any open Sketches or Features in SOLIDWORKS before running any calculations.